About two years ago I wrote a Rust crate to fulfill this promise:
If a crash occurs while updating a file, the file either contains the old contents, or the new contents, nothing in between.
This crate essentially solves the following problem: when you update a file, generally you open it, truncate it, write to it block-by-block, and eventually close it. The problem with this process is that if a crash occurs at any point during this process (the program segfaults, the kernel panics, the machine loses power, …), your file will be left in an intermediate state where the old contents are completely lost, and the new contents are only partially written (if at all). My crate solves this problem by making file updates atomic.
This crate is publicly available as atomic-write-file and you can read its description for more details (sorry, I’m very bad at naming things).
The way the crate works is simple:
- Instead of opening the target file directly, the crate opens a temporary file.
- You write to the temporary file.
- Once all changes are in, the temporary file contents are synced to the storage, and it is atomically renamed so that it replaces the target file.
This is not by any chance a new technique that I invented, and it’s a very common strategy to solve the problem. This technique guarantees that if a crash occurs at or before step 3, then the file will have the old contents, unchanged. If a crash occurs after step 3, then the file will have the new contents.
There’s a small caveat with this technique: if a crash occurs between steps 1 and 3, then the crate will leave behind a temporary file that occupies some space on the storage device with no purpose.
This is where Linux anonymous temporary files come into play: this Linux-specific feature allows you to create temporary files that are written on the filesystem, but are not given a path in the filesystem. If a crash occurs between step 1 and 3, the temporary file will simply be forgotten into oblivion.
Meet the opponent: btrfs
Using Linux anonymous temporary files seemed very appealing for
atomic-write-file to avoid leaving leftovers behind, although I knew that
they’re not the perfect solution: there’s limited support (they’re supported
only on Linux, and only on some filesystems), they require the use of Linux
features that may not be available all the time (the /proc filesystem), and
they also have the problem that, sooner or later, they will need to be given a
name if we want to be able to replace the target file, and this leaves a small
time window during which we could leave some cruft behind.
But none of these are huge problems, and in fact atomic-write-file is able to do a best effort attempt at using anonymous temporary files, and reverting to regular files if that doesn’t work.
One day I was notified about an issue on using my crate on the btrfs file system: after a crash, my crate could break its promise and leave the file contents empty. I did some investigation on the issue that you can read about if you’re interested, and then fixed it.
This problem was specific to btrfs, and I argue that it’s actually caused by a btrfs bug, rather than a bug in the crate itself, but nonetheless this issue had revealed a critical flaw of my crate: I did not have any tests to check if my crate was fulfilling its promise or not!
Therefore I decided to create a small test suite for Linux to simulate crashes and inspect the contents of files after those crashes occurred on a variety of filesystems, which is what this blog post is about. This test suite now runs on my laptop and on GitHub Actions, and potentially any other CI environment.
Testing strategy
Here’s the idea I came up with: I can create a virtual machine, with a virtual storage device attached to it, and a filesystem initialized with a file. The virtual machine updates the file using atomic-write-file, and then triggers a kernel panic. After that, the file is inspected for consistency.
So here is how it works in practice: there are 3 main pieces:
1. A test binary that is responsible for updating the test file using
atomic-write-file.
1. An init.sh script that runs inside the virtual machine.
1. The run-tests.sh script that puts everything together and starts up the
virtual machine.
The test binary
The test binary that is a short Rust program that I can paste here:
use atomic_write_file::AtomicWriteFile;
use std::io::Write;

fn main() {
    let mut file = AtomicWriteFile::open("/test/file").expect("open failed");
    file.write_all(b"hello").expect("write failed");
    file.commit().expect("commit failed");
}
Nothing special to see here: this is the minimal code required to use atomic-write-file.
The init.sh script
The init.sh script is more interesting: this script in fact is meant to run
twice. The first time it runs, init.sh will run the test binary above and
trigger the kernel panic. The second time, it will read the test file contents
and report them back run-tests.sh script for inspection.
Let’s take a closer look at what it does: first, it mounts the /proc and
/sys virtual filesystems. These are needed for some basic system functions,
and also to enable the Linux anonymous temporary file feature.
mount -t proc none /proc
mount -t sysfs none /sys
Then it mounts the filesystem containing the test file. Before it can do that,
however, it needs to load the correct kernel module for the filesystem. Nothing
too fancy here: the filesystem type is simply specified on the kernel command
line (read through /proc/cmdline):
fstype=$(grep -Eo 'test.fs=\w+' /proc/cmdline | cut -d= -f2)
modprobe "$fstype" || true
mount -t "$fstype" /dev/sdb /test
Then, if this script is run for the first time, it will run the test executable and quit:
echo 'Running test binary'
atomic-write-file-test
init.sh (as the name suggests) is run as the init script of the virtual
machine. In Linux, if the init script quits without invoking the proper
shutdown sequence, the kernel will panic. So we don’t actually need to do
anything special to trigger a panic. I could have inserted a echo c >
/proc/sysrq-trigger line to make it more explicit, but then I figured that
having that line wouldn’t be nice for people who want to test the script on
their system.
You might ask: how does init.sh know if it’s the first time it gets called or
the second? Again, nothing fancy here: run-tests.sh gives that hint using a
kernel command line argument:
if grep -q test.verify /proc/cmdline; then
  # ...
fi
If test.verify is specified on /proc/cmdline, then it means this is the
second time this script is run. In that case, the file contents are just
printed on the console:
if grep -q test.verify /proc/cmdline; then
  echo 'Verifying test file contents'
  echo '-----'
  xxd /test/file
  echo '-----'
  poweroff -f
fi
This uses xxd so in case there are garbled characters on screen, we can
comfortably analyze the output and figure out what happened. At the end, the
system is more gracefully shut down using poweroff to avoid another kernel
panic (this is not really necessary).
The run-tests.sh script
And then there’s the run-tests.sh script that crates the virtual storage,
launches the virtual machine, and inspects the file contents.
This is where most the complexity is, so let’s go step-by-step (the code below
has been simplified from the original for readability):
The first thing it does is compiling the test binary above. The virtual machine
runs in a very barebone environment, so I used static linking to avoid having
to copy additional libraries like libc:
target=$(uname -m)-unknown-linux-gnu
RUSTFLAGS='-C target-feature=+crt-static' cargo build --release --features "$cargo_features" --target "$target"
Then run-tests.sh creates a minimal initramfs for the virtual machine. The
initramfs is a filesystem that gets mounted by Linux early at boot. It’s
generally used by Linux distributions to load the main operating system, but in
my case the initramfs contains everything needed for the test. In particular,
it contains:
- The test binary.
- The
init.shscript. - BusyBox, to get the needed utilities like
xxdandpoweroff. - The kernel modules to mount filesystems and their dependencies.
The first 3 items are easy to set up:
cp "init.sh" -T "$initramfs_build_dir/sbin/init"
cp "atomic-write-file-test" -t "$initramfs_build_dir/bin"
cp "$(which busybox)" -t "$initramfs_build_dir/bin"
"$busybox" --install -s "$initramfs_build_dir/bin"
The kernel modules are a bit more complicated. First of all: where can we get them from? Ideally, I would have liked to download them from some minimal Linux distribution, but this turned out to be more complicated than expected. In the end, I decided to just steal them from the host operating system:
modules=/usr/lib/modules/$(uname -r)
cp -a "$modules" -t "$initramfs_build_dir/lib/modules"

while read -r mod_path; do
  if [[ "$mod_path" = *.ko.gz ]]; then
    gunzip "$mod_path" -o "$mod_path.uncompressed"
  elif [[ "$mod_path" = *.ko.xz ]]; then
    unxz "$mod_path" -o "$mod_path.uncompressed"
  elif [[ "$mod_path" = *.ko.zst ]]; then
    unzstd "$mod_path" -o "$mod_path.uncompressed"
  else
    continue
  fi
  mv "$mod_path.uncompressed" "$mod_path"
done < <(modprobe --dirname "$initramfs_build_dir" --show-depends "$filesystem_type" | grep ^insmod | cut -d' ' -f2)
What this does is copying all the module files from the host, getting all the
dependencies for the filesystem module using modprobe, and then uncompressing
those modules if they’re compressed (I found this much easier than adding
compression support in the virtual machine). An alternative approach would be
to simply decompress all the modules, but that’s much slower.
Once everything has been copied over and uncompressed, the initramfs is created:
initramfs=rootfs.img
mksquashfs "$initramfs_build_dir" "$initramfs"
Now it’s time to create the virtual storage device with the filesystem, which is a trivial task:
testfs=testfs.img
dd if=/dev/zero of="$testfs" bs=1M count=300
"mkfs.$filesystem_type" "$testfs"
Finally, we can start our VM using QEMU:
qemu=qemu-system-$(uname -m)
kernel=/boot/vmlinuz-$(uname -r)

"$qemu" \
  -kernel "$kernel" \
  -append "root=/dev/sda ro panic=-1 console=ttyS0 quiet test.fs=$filesystem_type" \
  -drive "index=0,media=disk,format=raw,file=$initramfs" \
  -drive "index=1,media=disk,format=raw,file=$testfs" \
  -no-reboot \
  -nographic
Again we’re stealing the kernel from the host operating system, which is also
where the kernel modules come from. The drive with index=0 is the initramfs
and will be visible as /dev/sda in the guest; the other drive with index=1
is our test storage and will be visible as /dev/sdb.
root=/dev/sda tells the kernel to boot from our initramfs image. panic=-1
tells the kernel not to reboot in case of a panic (panic=N specifies the
number of seconds to wait before rebooting in case of kernel panic; specifying
a negative value blocks that behavior). console=ttyS0 allows us to capture
the output printed by the init script. test.fs=... is the option that
init.sh is going to look for to understand what filesystem type to use.
Once that runs, the virtual machine is expected to do its job and crash with a
kernel panic. We then need to restart it to verify the file contents. The QEMU
command is exactly the same except for the additional test.verify option:
output=output.txt

"$qemu" \
  -kernel "$kernel" \
  -append "root=/dev/sda ro panic=-1 console=ttyS0 quiet test.fs=$filesystem_type test.verify" \
  -drive "index=0,media=disk,format=raw,file=$initramfs" \
  -drive "index=1,media=disk,format=raw,file=$testfs" \
  -no-reboot \
  -nographic \
  | tee "$output"
The output from this command is captured in a file that can be analyzed. If you
remember how init.sh is written, you might have noticed that it writes the
test file contents between two markers:
echo '-----'
xxd /test/file
echo '-----'
So what we have to do to verify the contents of the file is simply look for
those two ----- markers, get the content in between, and parse it through
xxd -r:
if [[ $(sed -n '/-----/, /-----/p' "$output" | xxd -r) = hello ]]; then
  echo "Success"
else
  echo "Failure"
  exit 1
fi
And that’s it!
Running in GitHub Actions
The next step for me was to set up some automation to make sure that my test script was run whenever I made any change to the crate. Because my project was already hosted on GitHub, I decided to go with GitHub Actions. I was a bit worried that I would have had to struggle to make it work because my script works by stealing the kernel from the host, and I thought that the GitHub runners could have some protections in place to prevent me from reading the kernel. To my surprise, there were no such restrictions. In fact, I did not have to modify a single line of code to make my tests work in GitHub Actions: check out the workflow file if you’re curious.
Result
In the end, the test suite was able to reproduce the issue with btrfs and anonymous temporary files, as well as show that the fix was working as intended. This is what it looks like (output in the screenshot was trimmed down a bit):
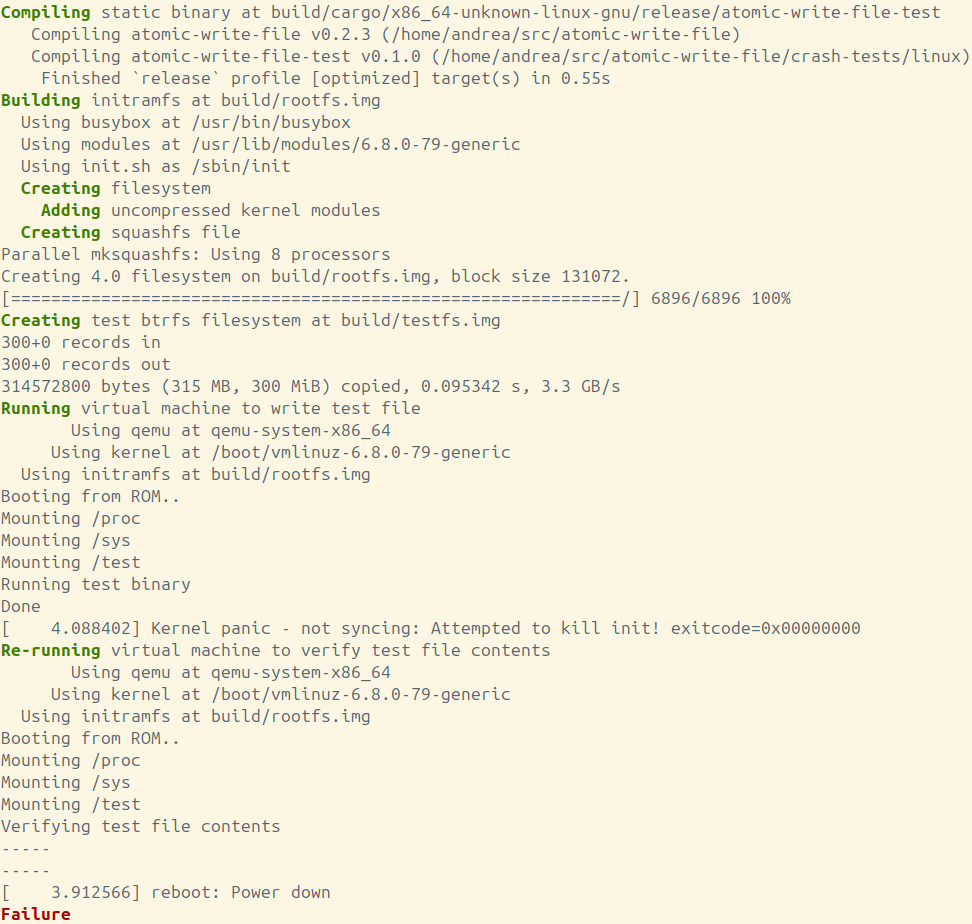
run-test.sh script before applying the fix, showing a failure.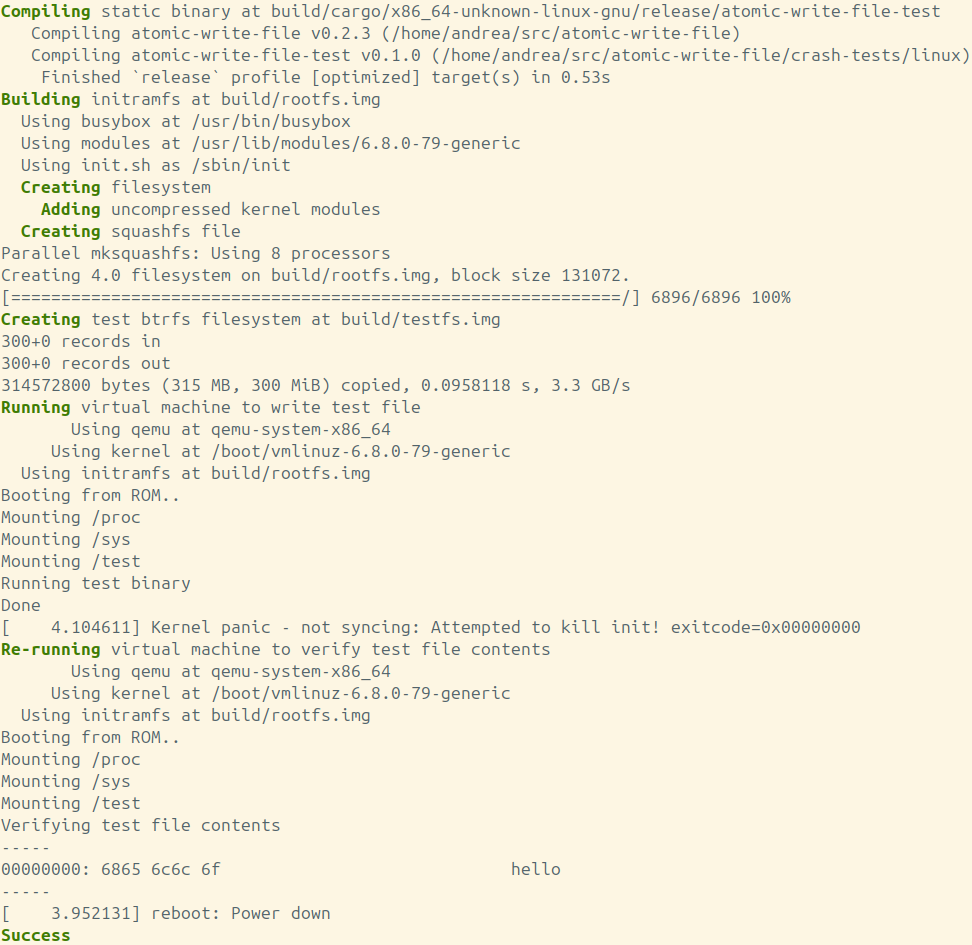
run-test.sh script after applying the fix, showing a success.Future
I’m pretty satisfied with the general approach of running in a virtual machine and simulating a crash, but the implementation has a huge limitation: because it steals the kernel from the host, it cannot simulate crashes on other kernels, operating systems, or platforms.
I think in the future I’m going to take a look at cross-rs, a cross-platform tool for Rust crates. Cross-rs works kinda in a similar way as my test suite, in that it uses QEMU emulation to run tests. Maybe I can reuse their QEMU images and tweak them to run my crash tests. If that is feasible, then I will be able to extend my test suite to all major platforms and operating systems.
Comments